A tankless water heater needs a vinegar or descaling-solution flush every 12 months to clear mineral scale off the heat exchanger, and the whole job takes under an hour with a $50-80 flush kit. This guide walks through the exact steps, the tools you need, and the mistakes that turn a simple flush into a service call.
- Flush a tankless water heater with a 4 percent white vinegar solution circulated for 45-60 minutes to dissolve scale.
- Sacramento's hard water (10-12 grains per gallon) accelerates scale buildup, so annual flushing in 2026 is not optional for tankless units.
- A DIY flush costs under $40 in vinegar and a flush kit; a scaled-over heat exchanger replacement runs well past $1,000.
- Isolation valves and a small utility pump are required; units without factory-installed service valves need a plumber to retrofit them.
- Skip the flush past 18 months and expect error codes, reduced hot water flow, and shortened unit life.
Why this matters
Tankless units heat water on demand by running it across a copper or stainless heat exchanger, and hard water leaves calcium and magnesium scale on that exchanger every time it fires. Sacramento's municipal water runs in the 10-12 grains-per-gallon range, which is firmly in hard territory, and manufacturers like Rinnai and Navien both void heat-exchanger warranties if you skip annual flushing.
Scale buildup shows up as reduced flow, fluctuating temperatures, and error codes long before the unit fails outright. A $150 valve retrofit and a $40 flush kit now beats a $1,200-plus heat exchanger swap later, and that math doesn't change whether the unit is three years old or eight.
Homeowners dealing with heavy scale on a repeat basis are often fighting hard water at the source, not just at the heater. Flores Precision Plumbing installs and services tankless units across Sacramento and sees the same failure pattern on units that never got flushed: caked heat exchangers, stuck flow sensors, and warranty claims denied for lack of maintenance records.
What you'll need
- Two isolation valves with hose bib ports (most tankless units ship with these pre-installed; older installs may not have them)
- A submersible utility pump rated for at least 1/6 HP
- Two 5-foot washing machine hoses or flush-kit hoses
- 4-5 gallons of white vinegar, or a commercial descaling solution (citric-acid based, sold specifically for tankless units)
- A 5-gallon bucket
- A Phillips screwdriver and adjustable wrench
- Gloves and eye protection
- 45-60 minutes of uninterrupted time
If your unit doesn't have isolation valves with hose ports, stop here and get a plumber to install a flush valve kit before attempting this. Running a flush without proper isolation valves risks cross-contaminating your home's water supply with vinegar.
The steps
1. Shut off power and gas
Cut power to the unit at the breaker if it's electric, or turn off the gas supply valve if it runs on gas. This step accomplishes one thing: it keeps the unit from firing while it's dry or filled with vinegar, which can crack a heat exchanger in seconds. Wait 2-3 minutes after shutoff before touching anything else. Common mistake: skipping the gas shutoff because the water's still running; the unit can still ignite on demand even mid-flush.
2. Close the isolation valves
Locate the hot and cold isolation valves, usually a pair of red and blue handles near the unit's water connections. Turn both to the closed position, which isolates the heat exchanger from your home's plumbing. This is what lets you circulate vinegar through the unit without it reaching your fixtures. Confirm no water flows from a nearby faucet before moving on.
3. Connect the pump and hoses
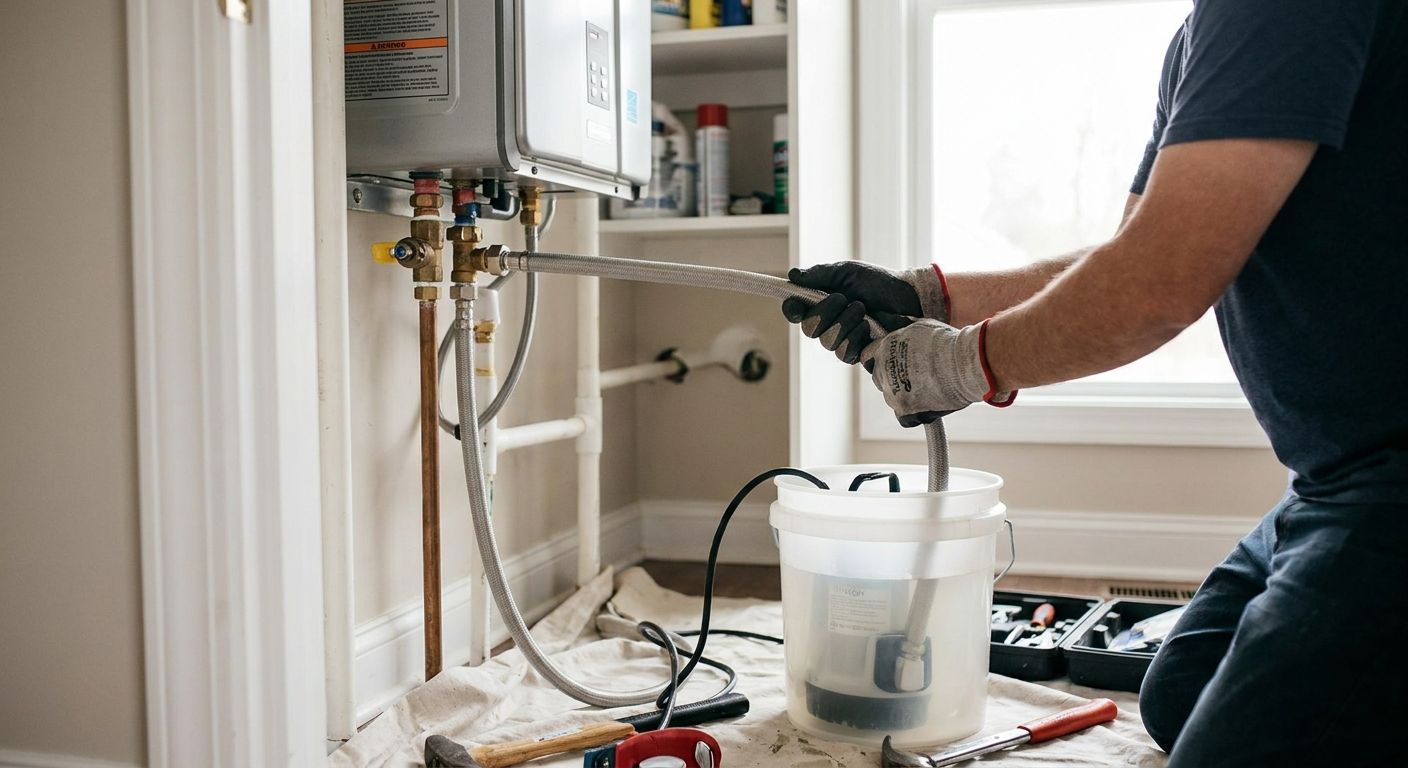
Attach one hose from the cold-water isolation valve's service port to the outlet of your utility pump, and the second hose from the hot-water service port back into your vinegar bucket. Set the pump inside the bucket, fully submerged in vinegar. Open both service ports (small valves, separate from the main isolation valves) so vinegar can flow in a loop. Common mistake: reversing the hose direction; check your unit's manual for the correct flow path, since flushing backward can dislodge scale into the wrong side of the exchanger.
4. Fill the bucket and run the pump
Pour 4-5 gallons of white vinegar (or mixed descaling solution) into the bucket, enough to fully submerge the pump intake. Turn the pump on and let vinegar circulate through the heat exchanger for 45-60 minutes. This dwell time is what dissolves calcium scale; anything under 30 minutes leaves buildup behind, and anything over 90 minutes offers no added benefit. Expected outcome: the vinegar turns cloudy or slightly discolored as scale breaks loose.
5. Drain and rinse
Turn off the pump, disconnect the hose from the cold-water port, and let the bucket's remaining vinegar drain through the hot-side hose. Then disconnect both hoses from the vinegar bucket, connect a garden hose to a clean water source, and flush plain water through the same service ports for 5-10 minutes to clear vinegar residue. Skipping this rinse leaves acidic residue in the exchanger, which corrodes fittings over time.
6. Reconnect isolation valves and restore service
Close both service ports, then reopen the main hot and cold isolation valves fully. Restore gas or power to the unit. Run a hot water tap for 2-3 minutes to purge any trapped air from the lines, which prevents the unit from short-cycling or throwing a false ignition error on first fire-up.
7. Check the inline filter
Most tankless units have a small mesh inlet filter just before the cold-water connection. Pull it, rinse off any sediment under a faucet, and reinstall it before you finish. A clogged inlet filter mimics scale symptoms (low flow, error codes) even right after a clean flush, so check it every time you service the unit.
Not sure your unit has service valves?
Flores Precision Plumbing installs flush kits and handles full tankless service in Sacramento.
Troubleshooting
- Unit throws an error code after the flush — Usually trapped air. Run a hot tap for 3-5 minutes and recheck; if the code persists, the flow sensor may still be scaled and needs a second, longer flush.
- Water pressure is lower than before the flush — Check the inline filter first; a clogged filter is the most common culprit, not the flush itself.
- Vinegar smell lingers in hot water for days — The rinse step was cut short. Run hot water at multiple fixtures for 10-15 minutes to clear residual vinegar from the lines.
- No isolation valves on the unit — Don't jury-rig hose connections directly to the water lines. Get a flush valve kit installed properly before flushing.
- Pump won't build pressure — Check that the pump is fully submerged and that both service ports are open; a closed port anywhere in the loop stalls flow.
- Scale comes back within 6 months — This points to water hardness above what annual flushing can offset on its own, which usually means it's time to look at a whole-house softener rather than flushing more often.
Tools and resources
- Utility pump and 5-foot flush hoses (sold as tankless flush kits at most hardware stores)
- 4 percent white vinegar or a citric-acid descaling solution, 4-5 gallons
- Manufacturer manual for your specific unit's service port layout
- If hardness is the recurring issue, review how to choose a water softener for hard water homes before your next flush cycle
What to do next
Mark the flush date on the unit or in a phone reminder set for 12 months out; annual flushing in 2026 and every year after is the single biggest factor in tankless heat-exchanger lifespan. If two consecutive flushes show heavy scale after only 6-8 months, hardness is outpacing your maintenance schedule and a whole-house softener is the next logical step rather than flushing more frequently.
FAQ
How often should you flush a tankless water heater?
Flush a tankless water heater once every 12 months under normal hard-water conditions. Homes on well water or water above 15 grains per gallon may need flushing every 6-9 months instead.
Can you flush a tankless water heater yourself?
Yes, if your unit has factory-installed isolation valves with service ports, a DIY flush with a pump and vinegar takes about an hour. Units without those valves need a plumber to install a flush kit first.
What's the best solution for descaling a tankless water heater?
White vinegar at roughly 4 percent acidity works for most residential units and costs under $10 a gallon. Commercial citric-acid descaling solutions clear heavier scale faster but cost more per flush.
Is vinegar better than commercial descaler for tankless units?
Vinegar handles routine annual scale removal fine and is what most manufacturers approve for standard flushing. Commercial descaler is worth the extra cost only when scale has built up past 18-24 months without a flush.
How much does it cost to flush a tankless water heater?
A DIY flush costs $30-40 in vinegar and hoses if you already have a pump, or $50-80 for a full flush kit. Professional flush service typically runs more but includes an inspection of valves, filters, and vent connections.
What happens if you never flush a tankless water heater?
Scale accumulates on the heat exchanger, cutting flow and efficiency until the unit throws error codes or fails to reach set temperature. Manufacturers commonly deny warranty claims on heat exchangers when there's no flush record.
Does Sacramento's hard water make tankless flushing more urgent?
Yes. Sacramento water runs 10-12 grains per gallon, which is hard enough to scale a tankless heat exchanger noticeably within a single year of skipped maintenance.
Can hard water damage a tankless water heater permanently?
Left unaddressed for multiple years, scale buildup can crack heat exchangers or seize flow sensors beyond what a flush can fix. At that point replacement of the exchanger, not just a flush, is usually the only repair option.
One last thing
The inline inlet filter gets skipped more than any other step in a DIY flush, and it's the reason homeowners call a plumber convinced the flush didn't work when the real issue is a $0 fix: pull it, rinse it, reinstall it, every single time.